

Making Sure Your Water-to-Air Heat Exchanger Is Working Properly
Posted by SEBASTIAN ZOTA
This chapter three of installing a water to air heat exchanger and we are going to talk about how to make it work inside your furnace and inside your home.
What we have done in Chapter two is actually installed the water to air heat exchanger inside the plenum of the hot air furnace, so now we're gonna make the water to air heat exchanger work inside your house seamlessly with the existing thermostats and your existing setup, so that if you are unable to feed your wood furnace or your wood stove that is using the water to air heat exchanger, your normal furnace is gonna act and work normally.
So that if your family's home and you're all plowing or whatever something else you might be doing, you're hunting, your family is still gonna plenty of heat in the house, and you don't have to worry about it. Or you go on vacation, that's another question, "When I go on vacation, what do I do?" A lot of this is gonna be talked about right now.
How to Make your Water to Air Heat Exchanger Work Inside Your Furnace
Water to air heat exchanger is installed. The foil tape is on. Everything's cleaned up. We're ready to make it work now.
So there are a couple different ways to hook up your water to air heat exchanger to your PEX supply.
PEX Supplies
Most of the people that run or use their outdoor wood furnace use a product called PEX. PEX is like a plastic material. The quality of PEX is very important. We sell a very high-end grade of PEX. And there's PEX out there that you can find very inexpensively, and what they do is the PEX quality is dependent on the cross-hatching and the success of the cross-hatching done via lights, or chemicals, or even machine that makes the cross-hatching.
Cash Acme
We use a product called Cash Acme. It's made in America, and the cross-hatching has exceeded 85%, which is at the higher ends.
A lot of the people think that Class A, or B, or C of the PEX pipe determines its quality. That is not necessarily true. But, anyways, buy a good quality PEX, you won't have any problems with it. Try to stay away from the cheap Chinese PEX. First of all, support the United States. Secondly, you're gonna have fewer problems.
Installing PEX to a Water to Air Heat Exchanger
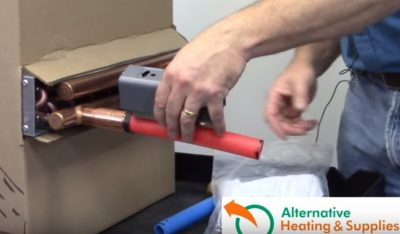
PEX to Copper Fitting
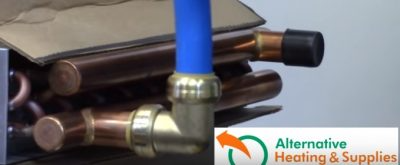
I find the easiest way to convert from PEX over to a copper manifold is a simple SharkBite fitting. All you do is you push this on and then you take your PEX and push that on.

PEX to Copper Fitting
And if you wanna take it apart, again, you can. The other thing nice about that, and a lot of people don't know, is that when you're installing PEX to a water to air heat exchanger, PEX shrinks and expands based on temperature. So when you first start up, the PEX will actually expand up to 6 inches over 100 feet.
And when it's cool, it'll shrink six inches. So when you're not heating, you're gonna find out that the PEX is shrinking and expanding.
The SharkBite
SharkBite
The nice thing about the SharkBite, even though it is attached and water-sealed, it does flex, so that if there is extension and growth of that PEX pipe, it has no bearing or little bearing on it.
The SharkBite also comes in a coupling design, which isn't straight on. So if you wanna come straight in or 90, if you wanna take a 90 bend. The other options are you can sweat it on. With the heat exchangers that I have and with the SharkBite, there are simple little tools that you click on to take them on and off. In this case, you're gonna see me pop that off, and it could be reattached.
Copper Sweating Pipes
The other option is copper sweating. You need a coupling.
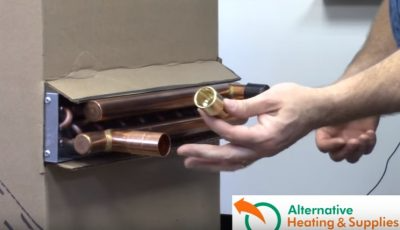
Copper Sweating
In this case, I have a brass sweat 2 crimp, and then you're gonna sweat that in, and you're gonna put on your PEX, and then you're gonna need a crimping tool to crimp that down. Now, you're done.
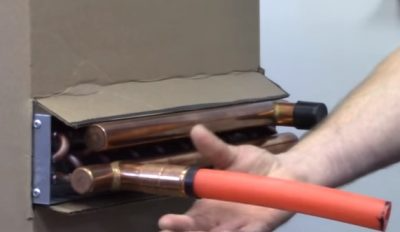
PEX Mounting
However, this will not move, or swivel, or bend. So this way is, once it's in, it's permanent. It won't move or shift with the expanding lines. So now you're gonna have to make up the expansion with the bends of the actual PEX.
Making a Heat Exchanger Work - Tips
One other thing that I wanna reiterate, I find it easier to have the bottom port as the supply, the hot water coming in, and the top port being the return. The reason why is the air will get through the heat exchanger easier and the air will rise up and then blow right through the line.
Now that we have the water lines hooked up, the water to air heat exchanger installed, ready to go, now we gotta figure out a way how to make it work.
Heat Exchanger Installation FAQs
A lot of people say, "Well, can I add another thermostat?" Sure you can, and you can have it turn on the hot air furnace. But I find that difficult, because now you gotta run a wire, and you gotta do all that. I have actually designed and I have a kit that I sell.
Aquastat & Hydro Coil Kit
Installation Kits
And a lot of these applications, the installs, they usually carry a kit. And the way I design these kits is, when I was doing the installs, I would go to the install place and I would forget what I needed for that kind of install. So what I started to do is take notes of what parts I needed for what kind of install and got everything in a bag. So when I went to that install, I knew exactly what I needed and just grabbed the bag and I had everything instead of going back and forth two or three times.
This is called an Aquastat & Hydro Coil Kit. It comes with the SharkBite fittings, and it also comes with a crimp version. So if you're looking for something like this and you don't wanna figure this out yourself, just call and ask for our kits. But it comes with the SharkBite.
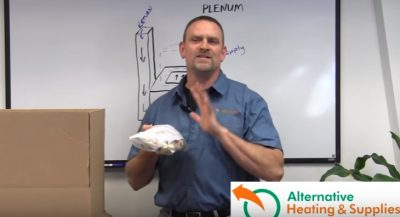
The Strap-On Aquastat
The Strap-On Aquastat
And then in this kit, which I think is the absolute best way to install these water to air heat exchangers, because now you don't have to mess with the thermostat that's upstairs, this is a simple strap-on aquastat.
And how this simply works is we're gonna mount this to the waterline coming in. And there's a strap and everything else.
And basically, what we're gonna do here is, as the furnace is calling for heat. So this is the thermostat that's upstairs in the house.
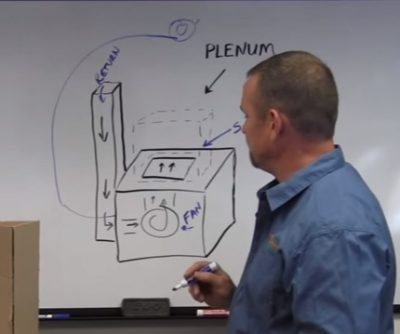
Thermostat
And once the house calls for heat, it's gonna come down to the existing wire that's already there, and it ties into the thermostat.
Now, what we're gonna do is now we have this water to air heat exchanger that's installed now, and the strap-on aquastat, is now when the thermostat calls for heat, it's actually gonna go up. And now, in my kit, I also have the wiring diagram, so you don't have to figure this house. It's actually really quite simple, just follow the diagram. But what it does is it breaks the wires, and it says, "Come up to this aquastat." And what it's saying is, "Hey, the house needs heat.
Does this aquastat mounted to this waterline...is the water in the outdoor wood furnace hot or not?" And if it says, "Yes, it is," it's gonna send the signal back down to the hot air furnace and say, "Great, we have everything we need. Please just turn on the fan and fan only." That's how simple it is.
So when the house is occupied, everything turns off and the fan is what turns on, because that's gonna blow the air through the heat changes and distribute it to the house.
Now, if the thermostat calls for heat, and you're on vacation, and comes down and goes to this aquastat, it says, "Is the water in this line hot or not?" The fire's outside. So it's gonna say, "No." So what it's gonna do is say, "Okay, we got no heat here. So go back to the hot air furnace and say, 'Fire the furnace, turn on the fan, turn on the oil jet, and run normal,'" okay? So what that does is now it's completely seamless. So if you don't have any heat in your outdoor wood furnace, your furnace is gonna react and work normally just with a simple aquastat.
How to Set up the Heating Exchanger When You Go on Vacation?
Now, when you go away on vacation, the beautiful system of this is you're gonna turn your house down to about 50 degrees. You're gonna load your wood stove as much as you humanly can, okay? So that still might run for or two, three, four, or even five days. I've had them run for days.
And basically once that conversion has been made, and it says, "I don't have any more heat here. Please turn my furnace normally," it's gonna save you a ton of money, and at the same time, since the water is circulating back and forth, the furnace is gonna be turning on running its oil hypothetically, and it'll actually put a little heat into this heat exchanger, which is gonna back here your wood stove outside to prevent it from freezing.
A lot of people think, "Well, wait a minute, that's a waste of energy." Okay, you can look at it that way, but I can assure you the amount of energy that you're gonna be spewing back to your outdoor wood boiler is gonna be a lot less money than it is gonna cost you for one meal out while you're on vacation.
It's very minute, and plus with your house at 50 degrees, the draw on the demand on the house is very small. So that is the easiest way. You don't have to worry about draining your unit when you go on vacation. The nice thing is you load up your stove as much as you can before you leave and you usually get four or five days out of it.
Check out our install and do it yourself kits and if you need assistance or you have questions that we did not cover here, give us a call!
